Friday, 31 August 2012

Disable Aero Shake in Windows 7


One of the interesting new features in Windows 7 is the way you can grab a window by the title bar
and “shake” it back and forth to minimize everything else. It’s a fun feature, but just in case you want
to disable it we’ve got the solution for you.
Disable Aero Shake Manual Registry Hack
Open up regedit.exe through the start menu search or run box, and then navigate down to the
following key:
HKEY_CURRENT_USER\Software\Policies\Microsoft\Windows
Once you are there, right-click on the Windows key and create a new key called Explorer.
Now right-click on the right-hand side, create a new 32-bit DWORD with the following settings:
Name: NoWindowMinimizingShortcuts
Value: 1
Once you’ve created this, you should log off and back on for the change to take effect.
Downloadable Registry Hack
Simply download, extract, and double-click on DisableAeroShake.reg to enter the information into the
registry. To re-enable use the other file.
Download DisableAeroShake registry hack from howtogeek.com

Thursday, 16 August 2012

Display Multiple Clocks in System Tray


Many users need to keep track of time in multiple time zones, there‟s a nice feature in Windows 7 to help users keep track of time in Multiple Time zones. The feature is multiple clocks in your system tray. This feature can display up to 3 clocks in your taskbar from 3 different Time Zones.
Click on the Clock in System tray
Next, click on the „Change date and time settings‟ to open Date and Time Window.

Click on the tab for Additional Clocks.
Here you can add up to two additional clocks .Enter time Zone and Clock Display name.
Check the „Show this clock‟ box to enable the clock.
Click OK.

Hover over the clock and it would show you Time in text for all 3 Time Zones (including the one your Local one).

Display a Message at Start Up


At the time of Windows boot up a popup message can be added which contains any message you wish to display. In many organizations there a display of a message to display instructions or policies of Organization etc. in Windows, whenever you boot it.
Here is how you can do it too:
 Open Registry Editor (Go to Start Run type Regedit & press enter)
 Navigate to : HKEY_LOCAL_MACHINE\SOFTWARE\Microsoft\Windows\CurrentVersion\Policies\System
 In the Right Side pane select & open LegalNoticeCaption and enter a value that you want to see in the Menu Bar.
 Next to it open LegalNoticeText and insert the message you want to display each time Windows boots.
 Close Registry & Restart for changes to take effect.

Setting up Menu bar text using LegalNoticeCaption key:

Setting up Message to Display after computer Boots up using LegalNoticeText key:
This trick works with Windows 7 and earlier Versions of Windows as well.

Customize UAC in Windows 7


Windows 7 User Account Control displays less warning than UAC in Vista, and lets you customize UAC according to your need and preference between security and a less annoying desktop experience. UAC prompts in Windows 7 are not as much as in Vista as very few programs require elevation, and Administrator can adjust these UAC prompts.
Go to Start > Control Panel > User Accounts > Change User Account Control Settings
Here you can select when to notify or bring the UAC prompt. There are 4 levels of security which includes:
 Always Notify
 Notify me only when programs try to make changes to my computer
 Notify me only when programs try to make changes to my computer (do not dim my desktop)
 Never Notify
Select them according to your balance between security and desktop experience and adjust the level of UAC prompt. Any change to the level of the UAC will prompt for confirmation.


Wednesday, 15 August 2012

Disable Wallpaper Change in Windows 7


Desktop wallpaper can be restricted and can be set against any change for a wallpaper.
Often Administrators in an organization feels their need to put their Organization wallpaper
on their computer which is fixed and can not be changed by any other user on that
computer. This can be done easily using a Group policy editor setting. Althoughthe same
can be done with Registry,Third party Software. This setting lets you specify the wallpaper
on users’ desktops and prevents users from changing the image or its presentation.
􀁸 Open Run Dialogue Box (Win + R) and type gpedit.msc
􀁸 Navigate to Local Computer policy > User Configuration > Administrative Templates
> Desktop in left hand side pane.
􀁸 Select Desktop Wallpaper setting from right side pane.
􀁸 Open it and enable it .
􀁸 To use this setting, type the fully qualified path and name of the file that stores the
wallpaper image. You can type a local path, such as C:\Windows\web\wallpaper\home.jpg .
Also this setting specify that the wallpaper image be centered, tiled, or stretched.
􀁸 Press OK
Note: This setting does not apply to remote desktop server sessions. Also Log off or restart
is required to make the changes affect.

Changing power button options

The “Shut Down” button in Windows 7 can becustomized with another action, if you use
shut down action very rarely, but you more often restart it or put it on hibernate.
To change the action of shutdown button,Right click the Start Button, go to Properties and
choose the ‘Power Boot Action” to do whatever you want, from the given options.It will give
you a drop down list amongst following option to select
from.
􀁸 Switch user
􀁸 Log off
􀁸 Lock
􀁸 Restart
􀁸 Sleep
􀁸 Hibernate
􀁸 Shutdown


Now the button at Start Menu would change and perform the action as selected.

Enable Run Command on Windows 7

A number of people have asked me how to enable the old Run dialog that existed on every other
version of Windows until Vista, and is still gone in Windows 7. One of the nice features of the old Run
dialog was that it saved the history of what you had typed in.
We should note first that you can always get to the run dialog by just hitting Win + R on the
keyboard, which is the simplest way to do so, and would probably be worth getting used to.
Otherwise, you can re-enable the run dialog by right-clicking on the Start Button, selecting Properties,
and then clicking Customize on the ensuing dialog window.
You’ll be taken to the Customize Start Menu screen.
Check the “Run command” checkbox in the list, and you should now be in business:.
Note the addition of the Run… button.

Monday, 13 August 2012

Windows 7 – Shortcut Keys


With all the less pleasant verdicts about Vista, Windows 7 is perhaps PC users’ next best news. Codenamed Blackcomb, this new Microsoft operating system is surely a successor over its predecessor Windows XP and definitely Vista. With Microsoft to end their support for Windows XP in 2014, we figured Windows 7 will be completely taking over things in the next year or so.
If you are a Windows users it’s probably time for a change or at least tryout this new operating system. Here are some shortcut keys to help improve your productivity and user experience with Windows 7. Full list after jump.


General Windows 7 Shortcuts


Shortcut
Description
Win + UP Arrow
Maximize the current window
Win + Down Arrow
Restore down or minimize current windows
Win + Left Arrow
Dock the current window to the left half of the screen
Win + Right Arrow
Dock the current window to the right half of the screen
Win + [number]
Activate and run the program pinned on Windows 7 Taskbar, running program won’t be affected
Win + Home
Minimize all but the current window
Win + Space
Makes all windows transparent so you can see through to the desktop
Win + Pause/Break
Open System Properties
Win + Tab
Flip Aero 3D [press Tab to cycle between Windows]
Win + B
Move focus to notification tray (the right-most portion of the taskbar)
Win + D
Show/Hide desktop
Win + E
Windows Explorer is launched
Win + F
Search
Win + G
Bring all gadgets on top and foreground
Win + L
Lock Computer
Win + M
Minimize all windows
Win + P
Open the projection menu (generally used for laptops connected to projectors)
Win + R
Run Command is launched.
Win + S
OneNote Screen Clipping Tool
Win + T
Show preview thumbnail of running applications in Windows Taskbar one by one without mouse over
Win + X
Mobility Center
Win + #
Quick launch
Win + =
Magnifier
Win + [+/-]
Enables the magnifier and zooms in/out
Win + Shift + Up Arrow
Maximize vertical size
Win + Shift + Down Arrow
Restore vertical size
Win + Shift + Left Arrow
Jump to left monitor
Win + Shift + Right Arrow
Jump to right monitor
Win + Shift + M
Undo all window minimization
Win + Shift + T
Cycles backwards
Win + Ctrl + F
Opens the Active Directory Find Computers dialog
Ctrl + Right Arrow
Move the cursor to the beginning of the next word
Ctrl + Left Arrow
Move the cursor to the beginning of the previous word
Ctrl + Up Arrow
Move the cursor to the beginning of the previous paragraph
Ctrl + Down Arrow
Move the cursor to the beginning of the next paragraph
Ctrl + Click
A pinned taskbar icon to cycle through the program’s open windows (e.g. IE)
Ctrl + Win + Tab
Persistent flip 3D
Ctrl + Shift with an arrow key
Select a block of text
Ctrl with any arrow key + Spacebar
Select multiple individual items in a window or on the desktop
Ctrl + Shift + Esc
Open Task Manager directly
Ctrl + Shift + N
Create new folder

Shortcuts for Ease of Access


Shortcut
Description
Right SHIFT for eight seconds
Turn Filter Keys on and off
Left ALT+left SHIFT+PRINT SCREEN (or PRTSCRN)
Turn High Contrast on or off
Left ALT+left SHIFT+NUM LOCK
Turn Mouse Keys on or off
SHIFT five times
Turn Sticky Keys on or off
NUM LOCK for five seconds
Open the Ease of Access Center
Win + U
Cycle through all open windows

For: Windows Explorer

Shortcut
Description
Alt + Left Arrow
Go back
Alt + Right Arrow
Go forward
Alt + Up Arrow
Go up a directory
Alt + Enter
Open the Properties window of the current selection
Alt + Spacebar
Open the shortcut menu for the active window
Alt + F4
Close the active window
Alt + Tab
Switch to previous active window
Alt + Esc
Cycle through all open windows
Alt + D
Move focus to address bar
Alt + P
Show/hide the preview panel
Ctrl + N
Open a new window
Ctrl + Mouse wheel
Change the view type (extra large, small, list view, detail, etc.)
Num Lock + Asterisk (*) on numeric keypad
Display all subfolders under the selected folder
Num Lock + Plus Sign (+) on numeric keypad
Display the contents of the selected folder
Num Lock + Minus Sign (+) on numeric keypad
Collapse the selected folder

For: Taskbar Modifiers

Shortcut
Description
Shift + Click on icon
Open a new instance
Middle click on icon
Open a new instance
Ctrl + Shift + Click on icon
Open a new instance with Admin privileges

For: Dialog Box


Shortcut
                              Description
Ctrl + Tab
                     Move forward through tabs
Ctrl + Shift + Tab
                     Move back through tabs
Shift + Tab
                     Move back through options
Tab
                    Move forward through options
Alt + underlined letter
Perform the command (or select the option) that goes with that letter
Enter
Replaces clicking the mouse for many selected commands
Spacebar
Select or clear the check box if the active option is a check box
Arrow keys
Select a button if the active option is a group of option buttons
Backspace
Open a folder one level up if a folder is selected in the Save As or Open dialog box


For: Photo Gallery


Shortcut
                    Description

Ctrl + F
               Open the Fix pane
Ctrl + P
               Print the selected picture
Ctrl + I
               Open or close the Details pane
Ctrl + Period (.)
               Rotate the picture clockwise


Ctrl + Comma (,)
               

               Rotate the picture counter-clockwise
Ctrl + Mouse scroll wheel
               Change the size of the picture thumbnail
Ctrl + B
               Best fit
Ctrl + E
               Search for an item
Alt + Left Arrow
               Go back
Alt + Right Arrow
               Go forward
Plus Sign (+)
               Zoom in or resize the picture thumbnail
Minus Sign (-)
               Zoom out or resize the picture thumbnail
Shift + Delete
               Permanently delete the selected item
Enter
               View the selected picture at a larger size


Logging In and Out Windows 7


Shortcut
                Description

Win + Right Arrow + Enter
               Shutdown
Win + Right Arrow + Right Arrow + R
               Restart
Win + Right Arrow + Right Arrow + S
               Sleep
Win + Right Arrow + Right Arrow + W
               Switch users

Customize the Manufacturer Support Info in Windows 7


If you have a computer with pre-installed Windows 7 or Vista, most likely you’ll notice the
manufacturer’s support information when you look in the system properties window. If you’d like to
customize this information or use a picture of your own in this space, you can do so easily.
Right-click on Computer and choose Properties or use the Win+Break key combination to bring up the
System properties screen:


Close-up view:


To edit the information in this screen, you’ll need to open up your registry editor and navigate down to
the following key:

HKEY_LOCAL_MACHINE\SOFTWARE\Microsoft\Windows\CurrentVersion\OEMInformation

Note: If this key does not exist, you can download the following registry file, which you will want to
edit before double-clicking to add into the registry.


You can modify the following fields and put any values you’d like into them, with the exception of the
Logo key, which you probably shouldn’t change.

Manufacturer
SupportHours
SupportPhone
SupportURL
Logo

The last important step is to either create or modify a bitmap file stored at the location specified in the
Logo key, usually set to:

C:\Windows\System32\oemlogo.bmp

For best results, you’ll want to use a small logo file, preferably somewhere around 100×100
height/width. Also note that copying the file to that folder will require administrative permissions.

Change Your Forgotten Windows Password with the Linux System Rescue

So far in our series we’ve covered various tricks for windows 7 but this time we gonna look upon how to reset password
so this time you should be a little more technical you might want to simply use the excellent System Rescue CD,
which is based on Linux.
Note that if you are using standard Windows encryption for your files, resetting the password will
permanently disable access to those files. In that case you should crack the password, which is
something we’ll cover in an upcoming article.


If you are an Ubuntu user and forgot your password, we’ve covered how to do that as well, either
the easy way with the grub menu or alternately with the live cd.

Creating the System Rescue CD

Before you can do anything else, you’ll need to download a copy of the System Rescue CD and burn
the ISO image to disc. For this task, I prefer the simple ImgBurn utility, but you are free to use
whatever burning application you prefer instead.
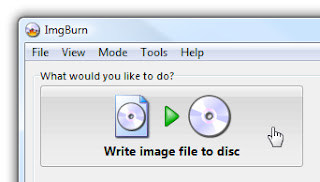
If you are using ImgBurn, click the Write image file to disc button…


Click the File button near Source and then pick the ISO file, then click the Burn button near the
bottom. That’s about all there is to it.


Download the System Rescue CD from sysresccd.org
Resetting Your Password
Now that you have your boot CD, you’ll want to boot from it, which will take you to this very
informative prompt, with some basic instructions on how to use the CD.
The first thing we’ll want to do is mount the hard drive, using this command. (Note that you might
not need to use the –o force argument, it’s only really for when the system didn’t shut down
correctly)


ntfs-3g /dev/sda1 /mnt/windows –o force
You can use the df –m command to verify that the drive has been mounted and that it’s the right
drive. Note that it’s mounted on /mnt/windows at this point.


Now you’ll want to change directory into the Windows/System32/config directory inside of your
windows installation. For mine, the full path was something like this, but it might be different on
yours:


cd /mnt/windows/Windows/System32/config
Once you are in that directory, you should see that there is a SAM file, which is where we’ll want to
change the passwords.
To change the password we’ll use the chntpw command, and it’s most useful to use the –l argument
first to list out all the usernames in the file.
chntpw –l SAM


Now you can add the –u argument with your username, which will end up being something like this
command, except you’ll want to replace geek with your username:

chntpw –u geek SAM

This will present you with a wizard type screen:


I’m going to assume that you want to set a new password, so just type “2″ at the prompt, add in
your password, and remember to use the “y” key when prompted to save.


At this point your password has been changed, so you can issue the reboot command to restart the


computer (should take the disc out of the drive)
And now you should be able to login with the new password:


Note that I tested this technique on both XP, Vista and Windows 7 with good results.

How to Create a System Image in Windows 7

The new backup utilities in Windows 7 are actually pretty impressive and creating an image will be
possible in all versions. Today we take a look at creating a backup image of your machine without the
need for a third party utility like Ghost or True Image.
You just just finished installing a fresh copy of Windows 7 on your computer and have it set up to
your liking. One of the first things you should do now is create an image of the disc so in the event of
a crash you will be able to restore it to its current state. An image is an exact copy of everything on
the drive and will restore it back to its current state. It’s probably best to create an image when
everything is clean and organized on your system. This will make the image file smaller and allows you
to restore the system with a smooth running set up.

Creating an Image in Windows 7

Click on Start go to Getting Started and then select Back up your files.
Next click on the Create a system image hyperlink.
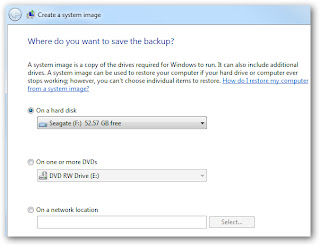
Decide where you want to save the image. You can choose an external drive, burn to multiple DVD’s,
or store it on a network location.
You can include other drives if you want as well but remember that will add to the size of the final
image.
At the confirmation screen notice the amount of space the image may take. If something doesn’t look
right you can still go back from this point and make adjustments.
A progress meter is displayed while the images is created and backed up. In this example a disk of
about 15GB in size took under 20 minutes backed up to an external drive. Times will vary depending
on your system and where you’re backing it up to.
After the process is complete you get the option to create a system repair disc which you should do
and make sure to save it in a secure location.
When it comes time to restore the image, you will be able to use the System Recovery Options to get
the system back.

Image in Windows Vista

Vista Ultimate, Business, and Enterprise allow you to create an image, but Vista Home and Home
Premium users do not have the option. The process is similar in Vista, type backup into the search bar
and click on Backup and Restore Center.
Then click on Back up computer and the wizard will guide you through the process.
Conclusion
This is a extremely handy feature and it actually works well. It is also nice that the feature will be
available in each edition of Windows 7 instead of just the higher end versions. This will save you some
money in not having to spend $50-80 on a third party utility. You should create an image when
everything is fresh on your system so the image is not too large and the essentials of you machine
can quickly be restored. For instance I created an image after a fresh install and putting Office 2007
and a few of my most commonly used programs. The entire image came in around 10 GB which is
easily stored on an external drive or a few DVD’s.

BitLocker To Go Encrypts Portable Flash Drives in Windows 7

The BitLocker feature was introduced in Windows Vista and allowed you to encrypt the content of
your hard drive. Now in Windows 7 they offer BitLocker To Go which allows you to encrypt portable
USB flash drives.


First open up My Computer and Right-click on the flash drive you want to encrypt and select Turn on
BitLocker.


After BitLocker initialized the flash drive you will need to enter in a password to unlock the drive. You
can also set up a Smartcard which are usually used in a work environment so talk to you IT staff.


Next you will be prompted to store the recovery key which is used in the event you lose your
password or smartcard. If you store it as a file make sure that it is not on the same drive that
you’re encrypting.


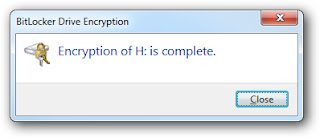
After the key has been saved as a file or printed you will see a confirmation message.


Finally you will be ready to start encrypting the drive so just click the Start Encrypting button.
While it is encrypting there will be a progress screen displayed.


A successful encryption of the USB flash drive. notice that the drive icon will change to show its


encrypted with BitLocker.
Notice that the drive icon will change to show its encrypted with BitLocker where the gold lock
indicates it is locked up and the gray lock is displayed after you have unlocked it.


Right-click on that icon to bring up options to manage BitLocker encryption.
The next time you plug in the drive to a Windows 7 machine you will be prompted to enter the


password to gain access to the drive. You can also always have it unlocked on specific machines in
the future.
You can also use the encrypted drive in Vista and XP. Here we will look at how it looks in XP, when


you plug it in you will be prompted for the password to launch BitLocker To Go Reader (the utility is
installed automatically on the drive by Windows 7).


BitLocker To Go Reader is a Windows Explorer type navigation utility for showing the content of the
drive.
With a BitLocker encrypted drive you will only be able to read and copy files. If you need to add files


or change them you will need to use a Windows 7 machine.
This is a great way to easily make sure sensitive data on your USB flash drive is safe. Right now


anyone who has Windows 7 RC1 Ultimate can use this feature.